Mastering Pipe Work: A Comprehensive Guide to Cut, Join, and Secure Pipes
Properly cutting, joining, and secure pipes is fundamental to various plumbing and construction projects. Understanding these processes ensures the efficient flow of water and other fluids while preventing leaks and structural issues. In this extensive guide, we’ll delve deeply into the intricacies of pipe work, providing detailed step-by-step instructions, comprehensive safety precautions, and valuable tips to ensure your project’s success.
Before we delve into the specifics, let’s take a closer look at the tools and materials you’ll need for each stage of the process.
Tools and Materials Needed
- Pipe cutter (for different types of pipes)
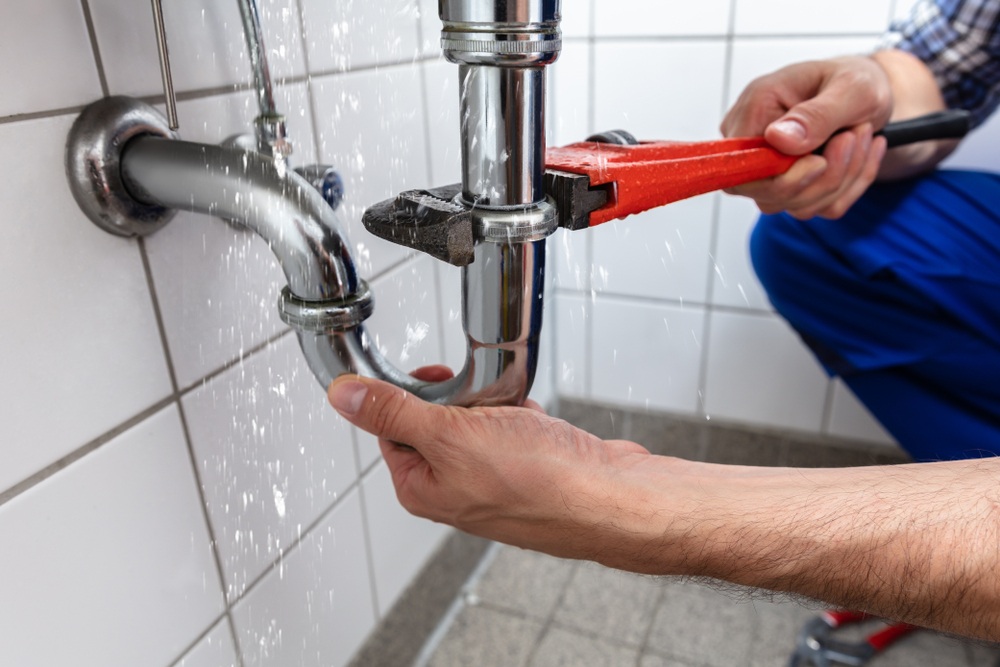
- Pipe wrench
- Hacksaw
- Deburring tool
- Flux and solder (for soldering)
- Torch or soldering iron
- Welding equipment (if applicable)
- Pipe supports (straps, clamps, etc.)
- Safety goggles
- Work gloves
- Protective clothing
Now, let’s explore each aspect of cutting, joining, and securing pipes in detail.
Cutting Pipes
Cutting pipes accurately is the first step towards a successful plumbing project. Different types of pipes require specific cutting tools to ensure clean and precise cuts. Let’s delve into the details:
Types of Pipes and Cutting Tools
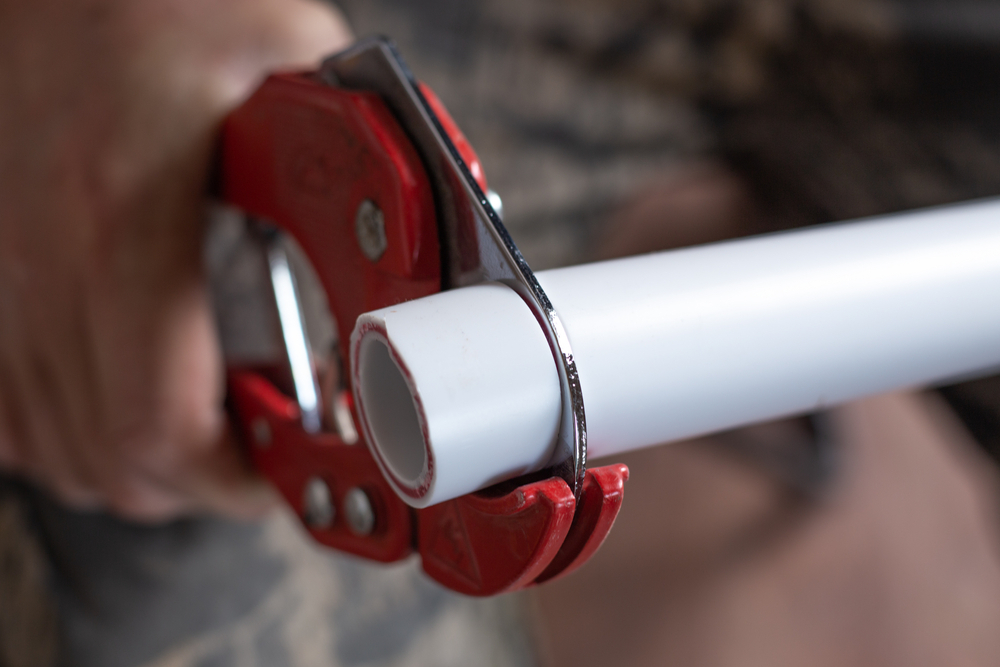
- PVC pipes: PVC pipe cutters or hacksaws are ideal for cutting PVC pipes cleanly and efficiently. PVC pipe cutters provide a precise, burr-free cut, while hacksaws offer versatility for cutting pipes in tight spaces.
- Copper pipes: Tubing cutters are specifically designed for cutting copper pipes, providing smooth, even cuts without distortion. They feature a sharp cutting wheel that rotates around the pipe, ensuring a clean cut without crushing or deforming the pipe.
- Galvanized steel pipes: Reciprocating saws or hacksaws equipped with metal-cutting blades are suitable for cutting galvanized steel pipes. Reciprocating saws offer power and speed for cutting through tough steel pipes, while hacksaws provide precision and control for manual cutting.
Step-by-Step Instructions
- Measure the required length of the pipe and mark the cutting point using a marker or pencil. Accuracy is crucial to ensure the pipe fits properly into the plumbing system.
- Secure the pipe firmly using a vise or pipe clamp to prevent it from moving during cutting. This ensures a clean, straight cut and reduces the risk of accidents.
- Position the cutting tool perpendicular to the pipe at the marked cutting point. Ensure that the cutting blade is aligned with the mark to achieve a precise cut.
- Apply steady pressure while rotating the cutter or saw around the pipe, ensuring a clean and even cut. Avoid applying excessive force, as this can cause the pipe to deform or the cutting tool to slip.
- Continue cutting until the pipe is completely severed. Take your time to ensure that the cut is straight and even, as any imperfections can affect the fit and integrity of the pipe.
- After cutting, use a deburring tool to remove any sharp edges or burrs from the cut end of the pipe. This step is essential for ensuring a proper seal when joining pipes and for preventing injuries during installation and handling.
Safety Precautions
- Always wear safety goggles to protect your eyes from flying debris and wear work gloves to safeguard your hands. Cutting pipes can produce sharp metal or plastic shavings that can cause injury if they come into contact with your skin or eyes.
- Exercise caution when using sharp cutting tools to prevent accidental cuts or injuries. Keep your fingers and hands clear of the cutting blade at all times, and avoid placing excessive pressure on the cutting tool, as this can cause it to slip or break.
- Ensure proper ventilation when cutting pipes indoors, especially when using a torch or saw. Some cutting tools produce fumes or smoke that can be harmful if inhaled, so work in a well-ventilated area or use a respirator if necessary.
Joining Pipes
Joining pipes securely is vital to prevent leaks and ensure the longevity of your plumbing system. Various methods, such as soldering, welding, and using mechanical fittings, can be employed for joining pipes. Let’s explore each method in detail
Types of Pipe Joints
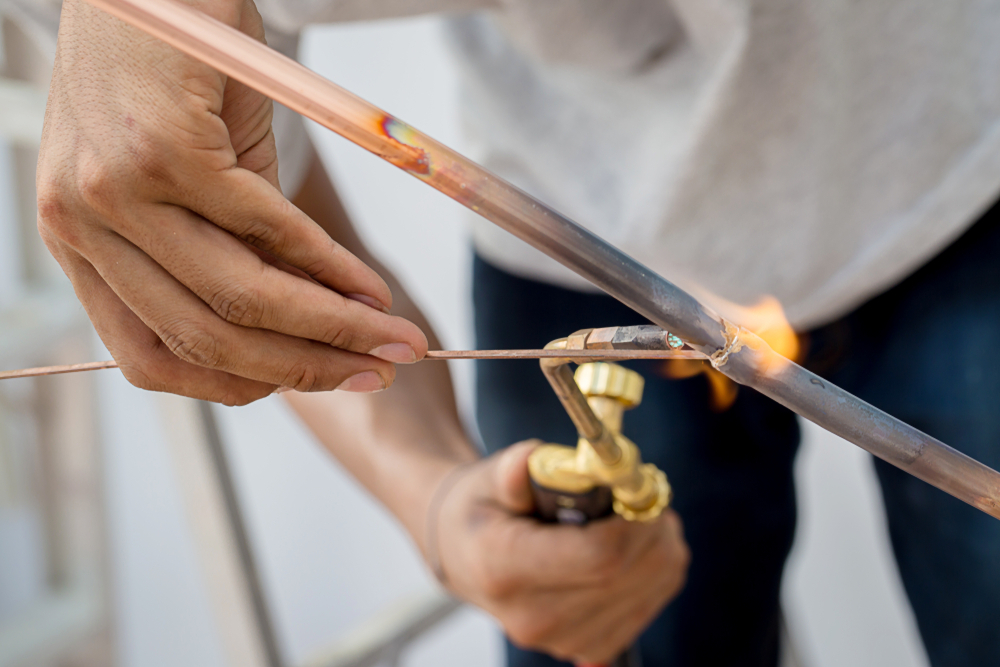
- Soldered joints: Commonly used for copper pipes, soldering involves the use of flux and solder to create a watertight seal between pipe fittings. This method is preferred for its reliability, ease of use, and affordability.
- Welded joints: Utilized for steel pipes, welding involves fusing the pipe and fittings together using heat and a filler material. This method produces strong, durable joints that are resistant to leaks and corrosion.
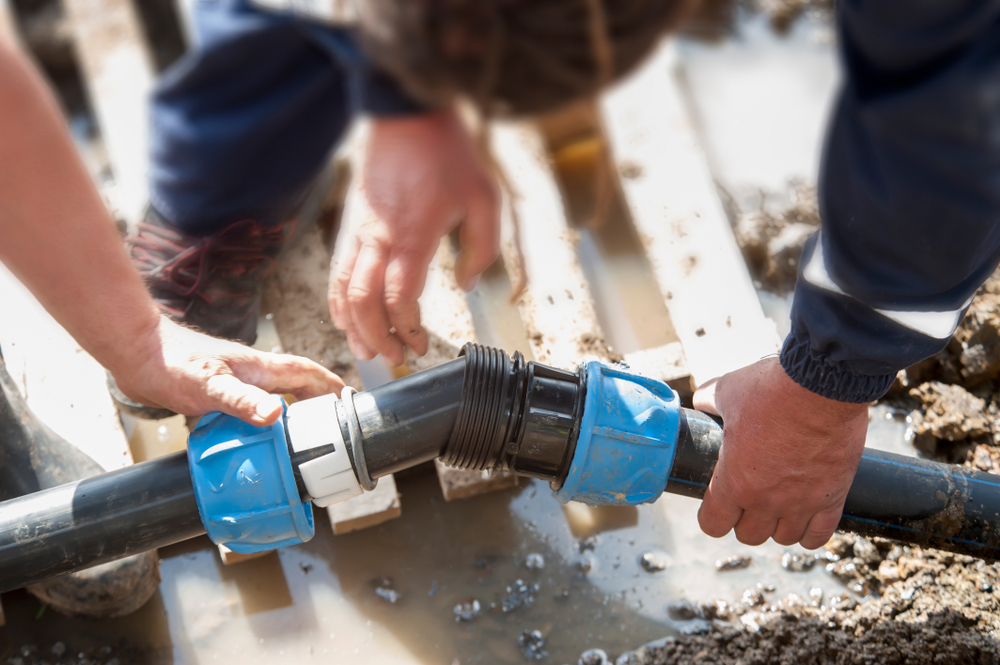
- Mechanical joints: These include compression fittings, push-to-connect fittings, and threaded connections, which provide a secure and leak-free connection without the need for heat or solder. Mechanical joints are easy to install and can be disassembled and reassembled if needed.
Step-by-Step Instructions for Soldering Joints
- Clean and deburr the ends of the pipes and fittings using a pipe cleaner or emery cloth. Proper cleaning ensures a clean surface for soldering and prevents contamination of the joint.
- Apply flux to the cleaned surfaces to prevent oxidation and ensure proper adhesion of the solder. Flux is a chemical compound that removes oxides from the metal surfaces and promotes the flow of solder.
- Assemble the pipes and fittings, ensuring a snug fit with no gaps or misalignments. Proper alignment is crucial for creating a watertight seal and preventing leaks.
- Heat the joint evenly using a propane torch or soldering iron until the flux begins to bubble and the metal surfaces reach the appropriate temperature. Heat the joint from all sides to ensure uniform heating and prevent overheating or burning.
- Apply solder to the heated joint, allowing it to flow smoothly and evenly around the entire circumference of the joint. The solder should melt and form a fillet around the joint, indicating a proper seal.
- Once the solder has cooled and solidified, wipe away any excess flux with a damp cloth. Excess flux can cause corrosion and discoloration of the pipe, so it’s essential to remove it after soldering.
Step-by-Step Instructions for Welding Joints
- Prepare the welding equipment and ensure that you have the appropriate safety gear, including welding gloves and a welding helmet. Welding produces intense heat and UV radiation, so it’s essential to protect yourself from burns and eye damage.
- Clean the surfaces of the pipes and fittings to be welded using a wire brush or grinder to remove any rust, scale, or contaminants. Proper cleaning ensures good weld penetration and prevents defects in the weld.
- Position the pipes and fittings in the desired alignment and tack weld them together to hold them in place. Tack welding creates temporary welds that keep the parts aligned during the welding process.
- Adjust the welding machine settings based on the type and thickness of the pipe material. Consult the welding machine manual for recommended settings and welding parameters.
- Start the welding process by striking an arc between the electrode and the workpiece, gradually moving the electrode along the joint to create a uniform weld bead. Maintain a steady arc length and travel speed to ensure consistent weld penetration and quality.
- Allow the welded joint to cool completely before handling or applying pressure. Welded joints can be brittle when hot, so it’s essential to let them cool naturally to avoid cracking or distortion.
Step-by-Step Instructions for Mechanical Joints
- Select the appropriate type of mechanical fitting for your application, ensuring compatibility with the pipe material and size. Mechanical fittings come in various designs, including compression, push-to-connect, and threaded fittings.
- Clean and deburr the pipe ends to ensure a smooth surface for the fitting to seal against. Remove any burrs or rough edges that could prevent the fitting from forming a proper seal.
- Insert the pipe into the fitting until it bottoms out against the internal stop or shoulder. Ensure that the pipe is fully inserted into the fitting to create a secure seal and prevent leaks.
- Tighten the compression nut or screw the threaded fitting onto the pipe until it forms a secure seal without over-tightening. Over-tightening can damage the fitting or deform the pipe, leading to leaks or structural issues.
- For push-to-connect fittings, simply insert the pipe into the fitting until it clicks into place, ensuring that it is fully seated. Push-to-connect fittings feature internal seals that grip the pipe and provide a watertight seal without the need for tools or additional components.
Welding Pipes
Tips for Secure and Leak-Free Joints
- Ensure that the pipe ends are clean, smooth, and free of debris before joining to promote proper adhesion and sealing. Use a wire brush or emery cloth to remove any dirt, rust, or oxidation from the surface.
- Apply flux and solder evenly around soldered joints to ensure a watertight seal and prevent pipe leaks. The solder should flow smoothly into the joint and create a fillet that fills any gaps or voids.
- Use the appropriate welding technique and filler material for the type of pipe material being welded. Consult welding procedure specifications (WPS) or welding codes for recommended procedures and materials.
- Tighten mechanical fittings securely without over-tightening, which can damage the fitting or cause leaks. Use a torque wrench or hand-tighten the fitting to the manufacturer’s recommended torque specifications.
- Conduct a pressure test on the completed joints to check for leaks before covering or concealing them. Pressurize the system to the specified test pressure and inspect each joint for signs of leakage, such as bubbling or hissing sounds.
Securing Pipes
Properly securing pipes is essential to prevent damage, reduce noise, and ensure structural integrity. Various types of pipe supports, including straps, clamps, and hangers, are available to provide the necessary support and stability. Let’s delve into the details:
Importance of Pipe Supports
- Prevents pipes from sagging or shifting under the weight of water or other loads, which can cause stress on the joints and fittings.
- Reduces vibration and noise transmission through the plumbing system, minimizing disturbances and improving occupant comfort.
- Protects pipes from damage due to thermal expansion and contraction, ensuring long-term durability and reliability.
Types of Pipe Supports
- Pipe straps: Used to secure pipes to walls or other surfaces, providing lateral support and stability. Pipe straps are available in various materials, including metal, plastic, and rubber, to accommodate different pipe sizes and mounting surfaces.
- Pipe hangers: Suspended from overhead structures, such as ceilings or beams, to support pipes from below. Pipe hangers are available in adjustable and fixed designs to accommodate different pipe configurations and load requirements.
- Pipe clamps: Offer adjustable support and allow for expansion and contraction of the pipe due to temperature changes. Pipe clamps feature a split design that allows them to be easily installed around the pipe and tightened securely to provide the necessary support.
Step-by-Step Instructions for Installing Pipe Supports
- Determine the appropriate spacing for pipe supports based on the type and size of the pipe, as well as the anticipated load. Consult plumbing codes and standards for recommended support spacing and requirements.
- Select the appropriate type of support based on the application and mounting requirements. Consider factors such as pipe material, diameter, and weight when choosing pipe supports.
- Position the support at the predetermined location and mark the mounting holes on the surface. Use a level to ensure that the support is installed plumb and level for proper alignment.
- Secure the support in place using suitable fasteners, such as screws, bolts, or anchors, ensuring that it is securely attached to the mounting surface. Use anchors or expansion bolts for mounting to concrete or masonry surfaces to provide additional strength and stability.
- Insert the pipe into the support and tighten any adjustable components to provide a snug fit. Ensure that the pipe is supported evenly along its length to prevent stress concentration and potential damage.
- Repeat the process for additional supports along the length of the pipe, maintaining consistent spacing as needed. Install supports at changes in direction, branch connections, and intervals specified by plumbing codes and standards to ensure proper support and stability.
Common Mistakes to Avoid
- Neglecting to install adequate pipe supports, resulting in sagging or unsupported sections of pipe. Inadequate support can lead to stress on the joints and fittings, causing leaks, damage, or failure of the plumbing system.
- Using improper support materials or spacing, leading to instability and potential damage to the plumbing system. Consult plumbing codes and standards for recommended support materials and spacing requirements based on the type and size of the pipe.
- Failing to secure pipes tightly within the supports, which can cause vibration, noise, and premature wear. Ensure that the pipe is securely fastened within the support and that any adjustable components are tightened to provide the necessary support and stability.
- Even with the best intentions and preparation, mistakes can still occur during pipe work, which can compromise the integrity and performance of the plumbing system. Let’s identify some common mistakes and learn how to avoid them.
Identification of Common Mistakes
Incorrect pipe measurements leading to inaccurate cuts and fittings, resulting in wasted materials and rework. Accurate measurements are essential for ensuring that the pipe fits properly into the plumbing system and that joints and fittings are aligned correctly.
Inadequate cleaning and preparation of pipe surfaces before joining, preventing proper adhesion and sealing. Proper cleaning and preparation are essential for removing dirt, oil, and contaminants that can interfere with the bonding of pipe joints and fittings.
Insufficient support and securing of pipes, resulting in structural issues such as sagging, vibration, or leaks. Proper pipe support is essential for preventing stress on the joints and fittings and ensuring the long-term stability and reliability of the plumbing system.
Tips for Avoiding Mistakes
- Double-check measurements and markings before cutting pipes to ensure accuracy and minimize waste. Measure twice, cut once to avoid costly mistakes and rework.
- Thoroughly clean and deburr pipe ends before joining to remove any debris or contaminants that could affect the quality of the joint. Use a wire brush, emery cloth, or pipe cleaner to clean the surfaces and remove any burrs or rough edges.
- Follow manufacturer guidelines and industry best practices for pipe installation, including proper support spacing and securing methods. Consult plumbing codes and standards for recommended installation practices and requirements to ensure compliance and reliability.
- By being mindful of these common pitfalls and following best practices for pipe work, you can minimize errors and ensure a successful plumbing project.
Conclusion
Mastering the art of cutting, joining, and securing pipes is essential for any plumbing or construction project. By following the detailed instructions, comprehensive safety precautions, and valuable tips provided in this guide, you can tackle pipe work with confidence and precision. Remember to use the right tools for the job, take your time to ensure accuracy, and seek professional assistance if needed. With practice and attention to detail, you’ll be able to handle pipe work like a pro, ensuring durable and leak-free results every time. Happy plumbing!
This comprehensive guide has equipped you with the knowledge and skills needed to tackle pipe work with confidence. Whether you’re a seasoned professional plumber or a DIY enthusiast, mastering the art of cutting, joining, and securing pipes is essential for success. By following the step-by-step instructions, comprehensive safety precautions, and valuable tips provided in this guide, you can ensure a seamless and leak-free plumbing project. So, roll up your sleeves, grab your tools, and let’s get started!
Plumbing Services CA
https://maps.app.goo.gl/31Yt4rhDrainzNJ4A
(279) 203-0765
https://plumbingservicesca.com/